
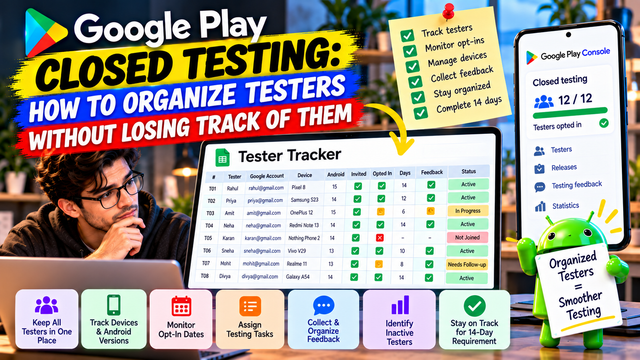
Learn how to organize Google Play Closed Testing testers, track opt-ins, devices, feedback, testing status, and communication throughout the 14-day testing period.
Managing a Google Play Closed Test sounds simple at first: add testers, share the opt-in link, collect feedback, and complete the testing period.
Then you have 12+ testers using different Google Accounts, some joining late, some forgetting to opt in, some stopping halfway, and someone inevitably saying, “I installed it yesterday. Does that count?”
This is why tester organization matters.
A well-organized tester group makes it easier to monitor participation, communicate clearly, collect useful feedback, replace inactive testers when necessary, and keep your testing process documented.
For personal developer accounts created after November 13, 2023, Google requires at least 12 testers to remain continuously opted in for 14 days before you can apply for Production Access. Testers who opt out before completing the required period do not count toward that requirement.
Here is a practical system you can use to organize your testers from Day 1 to Day 14.
Why Tester Organization Matters
Your tester list is more than a collection of email addresses.
You need to know:
Who has been invited
Who has actually opted in
Which Google Account each tester is using
When they joined
Whether they are still participating
Which device they are testing on
What features they have tested
What feedback they provided
Whether they reported bugs
Whether they stopped responding
Google Play allows closed-test testers to be managed through email lists or Google Groups, giving you different ways to structure your testing group.
The important part is building your own tracking system alongside Play Console.
1. Start With More Than the Minimum
If your goal is to meet Google's requirement of 12 continuously opted-in testers, inviting exactly 12 people creates unnecessary risk.
One tester could:
Forget to opt in
Use the wrong Google Account
Opt out
Stop participating
Encounter an installation problem
Leave the testing group
Google specifically states that testers who opt out and later opt back in must complete 14 consecutive days again to count toward the requirement.
A practical approach
Consider starting with 15–20 testers rather than relying on exactly 12.
That gives you a buffer if some testers become unavailable.
Remember, though: adding people does not automatically mean they are contributing to the required tester count. What matters is their actual testing status and continuous opt-in.
2. Create a Master Tester Tracking Sheet
A simple Google Sheet can make your life considerably less chaotic.
Create columns such as:
Tester
Google Account
Invited
Opted In
Opt-In Date
Device
Android Version
Last Check-In
Feedback
Status
Tester 01
✅
✅
Oct 15
Pixel
Android 15
Oct 20
Received
Active
Tester 02
✅
✅
Oct 15
Samsung
Android 14
Oct 19
Received
Active
Tester 03
✅
❌
—
OnePlus
Android 15
—
—
Pending
This gives you one central place to understand what is happening.
You do not need a complicated CRM system. A properly structured spreadsheet is often enough.
3. Separate Testers Into Clear Statuses
One of the easiest ways to lose track of testers is to treat everyone as being at the same stage.
Instead, assign a status.
Recommended statuses
Invited
You sent the tester the testing information.
Pending Opt-In
They received the invitation but have not confirmed that they opted in.
Opted In
They successfully joined the closed test.
Active
They are installing, using, and providing feedback.
Needs Follow-Up
They have not responded or provided expected feedback.
Inactive
They are no longer participating.
Replacement Needed
You need another tester to maintain a healthy testing group.
This simple system makes follow-ups much easier.
4. Record the Correct Google Account
This is one of the most important pieces of information to track.
A tester may tell you:
“I joined the test.”
But which Google Account did they use?
Google requires testers to use a Google Account or Google Workspace account to join a test. For closed tests using Google Groups, users must join the relevant group before opting into the test.
Ask testers to confirm the exact email address they used.
For example:
Tester Name: Rahul
Testing Account: [email protected]
Device: Samsung Galaxy S24
Android: Android 15
Status: Opted In
This prevents confusion when someone says they cannot see the test.
5. Use Meaningful Tester Labels
Instead of naming people randomly in your spreadsheet, give them simple identifiers.
For example:
T01
T02
T03
T04
T05
You can then record:
T01: Android 15 / Pixel
T02: Android 14 / Samsung
T03: Android 15 / OnePlus
This becomes particularly useful when you have many testers.
It also makes bug reports easier to understand.
Instead of:
“Someone's app crashed.”
You can record:
T07 | Samsung A54 | Android 14 | App crashed during checkout
Suddenly the bug has a chance of actually being fixed. Humanity survives another software release.
6. Track Device Diversity
Do not build your entire tester group around identical phones if you can avoid it.
Different devices can reveal different problems.
Track:
Manufacturer
Model
Android version
Screen size
Device type
Relevant hardware features
For example:
Tester
Device
Android
Primary Test
T01
Pixel 8
Android 15
Login
T02
Samsung S23
Android 14
Payments
T03
OnePlus 12
Android 15
Notifications
T04
Redmi Note
Android 14
Performance
This helps you connect problems to specific environments.
7. Give Different Testers Different Responsibilities
You do not need every tester to perform exactly the same checklist.
Create testing groups.
Group A: Core Functionality
Ask them to focus on:
Signup
Login
Main features
Navigation
Search
Forms
Payments, if applicable
Group B: User Experience
Ask them to focus on:
Navigation clarity
Button placement
Confusing screens
Text readability
Overall usability
Group C: Technical Testing
Ask them to focus on:
Crashes
Loading speed
Network behavior
Notifications
Background behavior
Device compatibility
This gives you broader coverage without overwhelming every tester.
8. Use Google Groups When They Make Sense
Google Play supports managing closed-test testers through Google Groups. Only members of the specified groups can join the test.
This can be useful when you have a larger or recurring tester community.
For example:
You can then maintain the group separately and use it for appropriate testing tracks.
For smaller tests, individual email lists may be simpler.
Google currently allows closed-test email lists with up to 2,000 users per list, with up to 200 lists and up to 50 lists per track.
You probably do not need anything remotely close to those limits for a normal 12–20 tester production-access test, but it is useful to know the platform can scale.
9. Record the Opt-In Date
This deserves its own column.
Do not simply record:
Tester joined.
Record:
Tester opted in: October 15
Why?
Because the 14-day requirement is based on continuous opt-in. If a tester opts out and later opts back in, their required 14-day period starts again.
Your sheet could therefore contain:
Tester
Opt-In Date
Current Status
T01
Oct 15
Active
T02
Oct 15
Active
T03
Oct 16
Active
T04
Oct 17
Active
This immediately tells you who joined later.
10. Keep a Tester Communication Channel
Google recommends considering a messaging group where closed testers can share feedback and context with one another.
You could use:
WhatsApp
Telegram
Slack
Discord
Google Groups
Email
Keep the purpose clear.
For example:
Tester Group
Use it for:
Testing announcements
New build notifications
Testing instructions
Bug reporting
Questions
Important reminders
Avoid turning the group into a 300-message conversation about someone's weekend. Your app has bugs to find.
11. Send a Standard Tester Onboarding Message
Every tester should receive the same core information.
Include:
App name
Purpose of the test
Testing link
Google Account requirement
Opt-in instructions
Installation instructions
Features to test
Testing duration
Feedback method
Bug-reporting format
Contact information
Google Play provides a shareable link for closed tests, and developers can provide a feedback URL or email address that appears on the tester opt-in page.
Consistency makes your tester management much easier.
12. Create a Daily or Regular Check-In System
You do not necessarily need testers to send you a message every day.
Instead, establish simple checkpoints.
Example
Day 1: Confirm installation
Day 3: Check core functionality
Day 5: Collect early feedback
Day 7: Review bugs
Day 10: Test updates and fixes
Day 12: Recheck important features
Day 14: Final feedback and readiness review
This gives your team visibility without annoying testers constantly.
13. Track Feedback Separately
Do not mix tester status and bug tracking into one giant spreadsheet monster.
Create a separate feedback sheet.
Tester
Feature
Issue
Severity
Device
Status
T01
Login
OTP delayed
Medium
Pixel 8
Fixed
T04
Checkout
Payment screen freezes
High
Samsung S23
Testing
T06
Profile
Text overlaps
Low
Redmi
Fixed
This makes it easier to identify recurring problems.
14. Watch for Repeated Complaints
If several testers report the same issue, pay attention.
For example:
1 tester: “The button is slightly confusing.”
5 testers: “I couldn't find the button.”
10 testers: “I didn't know where to continue.”
That is not ten unrelated opinions.
That is a UX signal.
Tester feedback should help you decide what needs improvement before production.
15. Have a Replacement Strategy
Your tester management system should answer one important question:
What happens if someone drops out?
Do not wait until Day 13 to think about it.
Keep a backup group of potential testers who can participate if needed.
However, remember that a replacement tester does not inherit another tester's completed days. The replacement needs to meet the applicable testing requirements through their own continuous opt-in period.
This is why starting with a buffer is safer than recruiting exactly 12 people.
16. Don't Confuse "Invited" With "Opted In"
These are different stages.
A tester can be:
Invited → Not Opted In → Opted In → Testing
Only after the tester actually joins the test should you consider them part of your opted-in testing group.
Google's closed-test setup supports email lists and Google Groups, while the tester still needs to complete the opt-in process.
Your spreadsheet should reflect this difference.
17. Keep Your Testing Records
Maintain a simple record of:
Tester list
Opt-in dates
Devices
Testing assignments
Feedback
Bugs
Fixes
Retesting
Important communication
Release versions
This documentation becomes particularly useful when preparing your Production Access application.
Google asks developers questions about their closed test, including how testers were recruited, how testers engaged with the app, what feedback was received, and what changes were made based on testing.
Good records make those answers much easier to provide honestly and accurately.
A Simple 14-Day Tester Organization System
Here is a practical structure you can follow:
Period
What You Track
Before Day 1
Tester names, accounts, devices
Day 1
Opt-in confirmation and installation
Days 2–3
Core functionality
Days 4–5
UX and navigation
Days 6–7
Bug collection
Days 8–10
New builds and fixes
Days 11–12
Retesting important issues
Day 13
Final feature coverage
Day 14
Final feedback and readiness review
The exact testing activities should depend on your app. A banking app, fitness app, game, and simple calculator should not have identical testing plans.
The Ideal Tester Tracking Sheet
A useful master sheet could contain these columns:
#
Tester ID
Name
Google Account
Device
Android
Invited
Opted In
Opt-In Date
Last Check-In
Feedback
Status
1
T01
Rahul
Pixel 8
15
✅
✅
Oct 15
Oct 20
Received
Active
2
T02
Priya
Samsung S23
14
✅
✅
Oct 15
Oct 20
Received
Active
3
T03
Amit
OnePlus
15
✅
❌
—
—
—
Pending
Keep this sheet updated throughout the test.
A Simple Tester Management Workflow
Your complete workflow can look like this:
Recruit Testers
↓
Record Their Google Accounts
↓
Record Devices
↓
Send Standard Instructions
↓
Confirm Opt-In
↓
Record Opt-In Date
↓
Assign Testing Areas
↓
Collect Feedback
↓
Track Bugs
↓
Verify Fixes
↓
Monitor Tester Status
↓
Maintain Backup Testers
↓
Complete Testing Period
↓
Prepare Production Access Answers
This structure keeps the process predictable.
Common Tester Organization Mistakes
Mistake 1: Keeping Only Email Addresses
An email address alone does not tell you whether the tester actually opted in or what device they are using.
Mistake 2: Not Recording Opt-In Dates
You may lose track of who has completed how much of the testing period.
Mistake 3: Treating Every Tester as Active
Someone who joined the group is not necessarily actively testing.
Mistake 4: Having No Backup Testers
One dropout can create unnecessary pressure.
Mistake 5: Sending Different Instructions to Everyone
Inconsistent instructions produce inconsistent feedback.
Mistake 6: Ignoring Device Information
A bug may only occur on a particular device or Android version.
Mistake 7: Collecting Feedback Without Structure
“App is good” is nice. It is also nearly useless for debugging.
Mistake 8: Waiting Until Day 14 to Review Everything
Testing should be monitored throughout the process, not treated like an exam where everyone suddenly remembers the syllabus on the last night.
Should You Use a Google Sheet or Play Console?
Use both.
Google Play Console is your official testing environment for configuring tracks, managing testers, distributing releases, and collecting testing feedback.
Your tracking sheet is your operational dashboard for organizing people, devices, assignments, communication, and follow-ups.
Google Play currently supports multiple closed tests simultaneously, which can also be useful when different teams or groups need to test different features.
When a Managed Testing Service Can Help
If recruiting, organizing, communicating with, and monitoring testers is becoming the biggest part of your project, a managed testing platform can reduce the administrative workload.
For example, inTesters provides a testing platform focused on Google Play closed testing, with tester management and testing-progress tools.
A service can help organize the testing process, but it should never be treated as a guarantee of Production Access. Google evaluates the actual testing and production readiness of your app.
Final Tester Organization Checklist
Before starting your closed test, verify:
You have more than the minimum number of potential testers
Tester names are recorded
Google Accounts are recorded
Devices are recorded
Android versions are recorded
Invitations have been sent
Opt-in status is tracked
Opt-in dates are recorded
A feedback channel is available
Testing assignments are clear
Tester communication is organized
Feedback is documented
Bugs are tracked
Fixes are retested
Backup testers are available
Testing progress is reviewed regularly
Production Access information is documented
Conclusion
Organizing testers is not about creating the fanciest spreadsheet on Earth.
It is about knowing who is testing, what they are testing, when they joined, what they found, and what you changed because of their feedback.
Google Play gives developers tools to manage closed-test users through email lists and Google Groups, while its Production Access process also asks about tester recruitment, engagement, feedback, and improvements made during testing.
So build a simple system before the testing begins.
Recruit a few more testers than the minimum, record their information, track opt-in dates, communicate consistently, assign testing areas, document feedback, and keep backups available.
Your future self, staring at the Play Console on Day 14, will be considerably less annoyed.
FAQs
1.How many testers should I recruit for a Google Play Closed Test?
For personal developer accounts subject to Google's testing requirement, at least 12 testers must be continuously opted in for the preceding 14 days when applying for Production Access. Recruiting additional testers can provide a useful buffer.
2.Can I manage closed-test testers using Google Groups?
Yes. Google Play supports managing closed-test testers through Google Groups. Members of the specified groups can join the test.
3.Should I track the tester's Google Account?
Yes. Tracking the account they actually use for testing can help resolve opt-in and access problems.
4.Should I record tester devices?
Yes. Device and Android-version information can help you identify device-specific bugs and improve test coverage.
5.What happens if a tester opts out?
A tester who opts out before completing the required period does not count toward the 14-day requirement. If they opt back in later, the required period must be consecutive.
6.Does Google require testers to use the app every day?
Google's published requirement focuses on continuous opt-in for the required period and tester engagement. It does not state that every tester must open the app every single day.
7.Can I run multiple closed tests?
Yes. Google Play supports multiple closed tests simultaneously, which can be useful for testing different features or working with different development teams.
8.What should I do with tester feedback?
Record it, categorize it, prioritize important issues, fix bugs, and retest the fixes. Google also asks about feedback and changes made as part of the Production Access process.
About the Author

Saksham Goyal
Expert software tester and contributor to the community. Passionate about AI, automation, and user experience.