
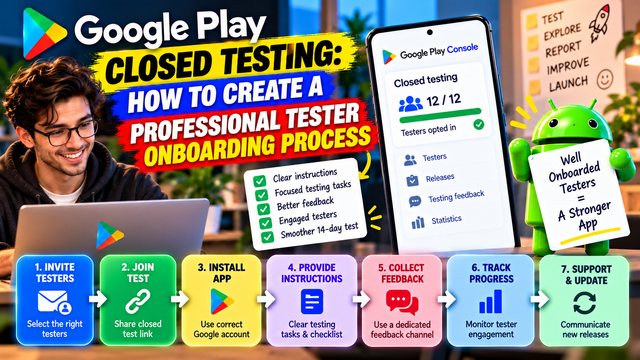
Learn how to create a professional Google Play Closed Testing onboarding process with clear instructions, testing tasks, feedback channels, tester tracking, and practical best practices.
Recruiting testers is only half the job.
Once someone agrees to test your Android app, you need to make sure they know how to join, what to test, where to report problems, and what you expect from them.
A professional tester onboarding process can make your Google Play Closed Test more organized, improve the quality of feedback you receive, and help you identify problems before requesting Production Access.
For personal developer accounts created after November 13, 2023, Google requires a closed test with at least 12 testers continuously opted in for at least 14 days before you can apply for Production Access. Google also asks about tester engagement, feature usage, feedback, and changes made based on the test.
So instead of sending testers a link and hoping civilization takes care of the rest, build a proper onboarding process.
What Is Tester Onboarding?
Tester onboarding is the process of taking someone from:
“I agreed to test your app.”
to:
“I successfully joined the test, understand what to do, know how to report issues, and can use the app properly.”
A good onboarding process should cover:
Who the tester is testing for
How to join the closed test
Which Google Account to use
How to install the app
What features to test
What problems to look for
How to submit feedback
How to receive future test updates
Who to contact when something doesn't work
The goal is to remove unnecessary confusion before testing even begins.
Why Professional Tester Onboarding Matters
A tester can be willing to help and still provide almost no useful testing if the process is unclear.
For example, imagine sending this message:
“Please join my closed test and test the app for 14 days.”
The tester may immediately ask:
Where do I join?
Which account should I use?
Where is the app?
What exactly should I test?
How do I report a bug?
Do I need to use every feature?
What happens if the app doesn't install?
A professional onboarding process answers those questions upfront.
Google recommends giving testers clear instructions, specifying the feedback you want, encouraging them to use as many features as possible, and providing a clear feedback channel.
Step 1: Choose the Right Testers Before Onboarding
Good onboarding starts with good tester selection.
Google recommends recruiting a diverse group of testers to help identify bugs and usability issues affecting different users and device types. It also suggests finding potential testers through personal and professional networks, communities related to your target audience, and social media.
Look for testers who are:
Comfortable using Android
Relevant to your target audience
Willing to follow instructions
Able to provide honest feedback
Using different devices where possible
Available throughout the testing period
For example, if you're building a fitness application, testers who actually exercise can provide more useful feedback than people who have never used a fitness app.
Don't focus only on quantity
The official minimum is 12 continuously opted-in testers for the required 14-day period for eligible personal accounts.
But your goal should be useful testing, not simply collecting 12 email addresses.
Step 2: Create a Simple Tester Welcome Message
The first message should be short and clear.
Don't send testers a giant instruction manual that looks like it was written by a government committee.
Give them the essentials first.
Example welcome message
Welcome to the Android app testing group!
Thank you for helping us test the app before its public release.
During the testing period, you'll be asked to:
Join the Google Play Closed Test
Install the test version
Explore the main features
Report bugs or confusing experiences
Share honest feedback
Please use the same Google Account that you use on your Android device to join the test.
We'll provide the opt-in instructions and testing tasks below.
Step 3: Explain the Google Account Requirement
Testers need a Google Account or Google Workspace account to join a Google Play test.
Make this clear during onboarding.
Tell testers:
“Please make sure you join the test using the Google Account that you use on your Android device.”
This can prevent a surprisingly common problem: someone receives the invitation on one account but tries to access the test using another.
Human beings do love creating three Google accounts and then forgetting which one owns what.
Step 4: Explain How the Closed Test Works
Your testers should understand that this is a pre-release version of the application.
Explain that:
The app is still being tested
They may encounter bugs
Some features may change
They should report unexpected behavior
Updates may be released during testing
Their feedback will help improve the app
This sets realistic expectations.
It also makes testers more comfortable reporting problems instead of assuming every broken button is somehow their fault.
Step 5: Give Them the Correct Opt-In Instructions
Google Play provides a shareable link for testers to access a closed test.
For a closed test, testers need to follow the opt-in process before installing the test version. If you're using a Google Group, users must join the specified group before opting into the test.
Your onboarding message should therefore contain:
1. Testing link
Provide the correct closed-testing opt-in link.
2. Account instruction
Tell testers which Google Account they should use.
3. Opt-in instruction
Ask them to complete the opt-in process.
4. Installation instruction
Tell them how to install the test version from Google Play.
5. Confirmation
Ask them to confirm once they have successfully joined.
Step 6: Tell Testers What Success Looks Like
Don't assume testers know what you're looking for.
Give them a simple definition of successful onboarding.
For example:
You're successfully onboarded when:
You have joined the closed test
You can access the test version
The app is installed
You can open the app
You have completed the initial setup
You know where to report feedback
This gives both you and the tester a clear starting point.
Step 7: Give Testers a Feature Checklist
A professional tester should know what areas need attention.
Create a checklist based on your actual app.
Example
Account
Sign up
Login
Logout
Password recovery
Main Features
Feature A
Feature B
Feature C
Navigation
Menus
Back button
Screen transitions
Search
Notifications
Push notifications
Notification links
Reminder functionality
Settings
Profile
Preferences
Account settings
Not every app will have these features. Customize the list according to your product.
Google specifically asks during Production Access whether testers used the available features and whether their usage matched expected production behavior.
Step 8: Explain What Kind of Feedback You Want
“Give feedback” is too vague.
Tell testers exactly what you're looking for.
Ask them to report:
Bugs
App crashes
Buttons that don't work
Incorrect results
Broken links
Login problems
Performance
Slow loading
Freezing
Unexpected delays
Battery-related problems
User Experience
Confusing screens
Difficult navigation
Unclear instructions
Features that are difficult to discover
Compatibility
Device-specific problems
Screen layout issues
Android-version-specific behavior
The more specific your questions, the more useful the answers become.
Step 9: Provide One Clear Feedback Channel
Don't tell testers:
“Send feedback wherever you want.”
That creates chaos.
Google allows developers to provide a direct feedback channel such as an email address, website, or message forum, and testers can also provide private feedback through Google Play.
Choose one primary channel.
For example:
Google Form
Email
WhatsApp group
Telegram group
Discord
Dedicated feedback page
For a small testing team, a simple Google Form can work well.
Suggested feedback form
Tester:
Device:
Android version:
Feature tested:
What happened?
What did you expect?
Steps to reproduce:
Screenshot/video:
Severity: Low / Medium / High
Now your feedback becomes something you can actually analyze instead of a collection of “bro app not working” messages.
Step 10: Give Testers Their First Task
Don't let the onboarding process end with installation.
Give testers an immediate, simple task.
For example:
First Testing Task
Open the app.
Create an account.
Complete onboarding.
Explore the home screen.
Use the primary feature.
Report anything confusing or broken.
This gives testers momentum.
Once they complete the first task, you can introduce more detailed testing activities.
Step 11: Break Testing Into Stages
Instead of giving testers 40 tasks on Day 1, spread testing across the test period.
Days 1–2: Installation & Onboarding
Focus on:
Installation
Sign-up
Login
Initial setup
Days 3–5: Core Features
Focus on:
Main functionality
Primary workflows
Normal user behavior
Days 6–8: Navigation & UX
Focus on:
Navigation
Search
Settings
Screen transitions
Days 9–11: Real-World Usage
Focus on:
Longer sessions
Notifications
Different network conditions
Returning to the app later
Days 12–13: Bug Retesting
Ask testers to verify important fixes.
Day 14: Final Review
Ask testers to complete the main user journey and report remaining issues.
This structure creates a much more organized testing process.
Step 12: Keep Communication Professional
Your testers don't need five messages a day.
Use concise updates.
Example
Testing Update
Today's focus: Notifications 🔔
Please test:
Notification delivery
Notification tap behavior
Deep-link destination
Notification settings
Please report anything unexpected through the feedback form.
Thank you for helping us improve the app.
Clear communication makes testing easier for everyone.
Step 13: Tell Testers When a New Version Is Available
When you release an update, tell testers what changed.
Example
New Test Version Available
We've released an updated version with:
Improved login flow
Fixed notification issue
Faster loading
Updated profile screen
Please test these areas and let us know whether the reported issues are resolved.
This turns each update into a focused retesting opportunity.
Step 14: Track Tester Onboarding Status
Create a simple tracker.
Tester
Invited
Opted In
Installed
First Task
Feedback
Tester 1
✅
✅
✅
✅
✅
Tester 2
✅
✅
✅
✅
⏳
Tester 3
✅
⏳
❌
❌
❌
Tester 4
✅
✅
✅
✅
✅
This helps you quickly identify where someone is stuck.
For example:
Invited → Not opted in
means the tester probably needs help joining.
Opted in → Not installed
means they may need installation instructions.
Installed → No feedback
means they may need clearer testing tasks.
Step 15: Keep Backup Testers
Don't build your entire testing plan around exactly 12 people.
The formal requirement is at least 12 continuously opted-in testers for the preceding 14 days when applying for Production Access for eligible personal accounts.
A larger pool can give you some practical protection against drop-offs.
For example:
Required: 12
Practical pool: 15–20
The larger number is a planning recommendation, not an additional Google requirement.
Step 16: Handle Tester Problems Quickly
Your onboarding system should include basic troubleshooting.
Problem: Tester can't access the test
Check:
Correct Google Account
Correct opt-in link
Tester actually opted in
Google Group membership, if applicable
Test status in Play Console
Problem: Tester can't find the app
For closed tests, testers may need the appropriate Play Store URL or opt-in link because the test version isn't necessarily discoverable through normal Google Play search.
Problem: Tester says the app isn't available
Check whether the test has been published and whether the tester meets the access requirements.
Google notes that the testing link can take several hours to become available after the test is published, and subsequent changes can also take several hours to become available.
Step 17: Build a Tester FAQ
A small FAQ can dramatically reduce repetitive questions.
Can I use any Google Account?
You need a Google Account or Google Workspace account that can join the test. Use the account intended for testing consistently.
Where do I install the app?
Use the testing instructions and Play Store/opt-in link provided by the developer.
Can I report bugs?
Yes. Use the designated feedback channel.
What should I test?
Follow the feature checklist and assigned testing tasks.
What if I find a serious bug?
Report it immediately with steps to reproduce and, where useful, screenshots or screen recordings.
Will the app change during testing?
It may. Test versions can be updated during the testing period.
Step 18: Treat Feedback as Part of Onboarding
A professional onboarding process doesn't end after installation.
The complete process should look like this:
Invite → Opt In → Install → Understand → Test → Report → Fix → Retest
That final loop is important.
Google recommends continuing closed testing while resolving user-reported issues and bugs, rather than treating the testing period as merely a countdown toward Production Access.
A Professional Tester Onboarding Template
You can use this structure when onboarding testers:
Welcome
Thank you for joining our closed testing program.
Step 1: Join
Use the provided Google Account and complete the closed-test opt-in process.
Step 2: Install
Install the test version from Google Play.
Step 3: Explore
Start by completing the onboarding process and exploring the main features.
Step 4: Test
Follow the testing checklist provided for each stage.
Step 5: Report
Report bugs, usability problems, performance issues, and unexpected behavior through the designated feedback channel.
Step 6: Retest
When a new version is released, test the affected features again.
Step 7: Final Review
Complete the main user journey and report any remaining issues.
This simple structure gives testers a clear path from beginning to end.
How to Make Your Tester Onboarding More Professional
A strong onboarding process should be:
Clear
Testers should immediately understand what they need to do.
Short
Give people the information they need without burying it under unnecessary paragraphs.
Structured
Use numbered steps, checklists, and clear testing stages.
Accessible
Make it easy to find the opt-in link and feedback channel.
Consistent
Use the same process for every tester.
Responsive
Answer tester problems quickly.
Trackable
Maintain a record of onboarding, testing, feedback, and fixes.
Common Tester Onboarding Mistakes
1. Sending Only the Opt-In Link
The link gets testers into the test, but doesn't tell them what to do afterward.
2. Giving Too Many Instructions at Once
A giant wall of text can discourage testers before they even install the app.
3. Not Explaining Feedback
“Please give feedback” isn't a useful testing strategy.
4. Not Tracking Tester Status
Without a tracker, you may not realize that several testers never completed onboarding.
5. Using Multiple Unclear Communication Channels
Scattered feedback across WhatsApp, email, Telegram, and five other places quickly becomes impossible to manage.
6. Ignoring Device Diversity
Different devices and user groups can expose different problems.
7. Treating Testing as an Attendance Exercise
The objective isn't merely to keep a tester technically enrolled.
The objective is to learn whether the app actually works for real users.
Final Tester Onboarding Checklist
Before starting your closed test, make sure you have:
Defined your target tester profile
Created a tester list
Prepared a welcome message
Explained the Google Account requirement
Prepared the closed-test opt-in instructions
Provided installation guidance
Created a feature checklist
Defined the feedback you want
Created one primary feedback channel
Prepared initial testing tasks
Created a tester tracking sheet
Prepared troubleshooting instructions
Created a tester FAQ
Planned testing stages
Prepared a process for communicating updates
Identified backup testers
Planned how feedback and fixes will be documented
How a Professional Onboarding Process Helps With Production Access
When you eventually apply for Production Access, Google asks about your closed test, including:
How you recruited testers
How testers engaged with the app
Whether they used all available features
Whether their usage matched expected production behavior
What feedback you received
How you collected that feedback
What changes you made based on testing
How you determined the app was ready for production
A structured onboarding process makes these questions easier to answer honestly because you have actually documented the process.
Your testing story becomes:
Recruit → Onboard → Test → Collect Feedback → Improve → Retest → Evaluate → Apply
That is far more useful than simply saying:
“We had 12 testers.”
Conclusion
A professional Google Play Closed Testing process starts before the first tester opens your app.
Give testers clear instructions, make the opt-in process simple, explain what to test, provide a reliable feedback channel, track their progress, and communicate important updates throughout the testing period.
For eligible personal developer accounts, Google requires at least 12 testers to remain continuously opted in for 14 days before applying for Production Access. But the number alone isn't the entire story. Google also evaluates tester engagement, feature usage, feedback, and the improvements made during testing.
The best tester onboarding process is therefore simple:
Clear instructions + relevant testers + focused tasks + useful feedback + documented improvements = stronger testing.
And when your testers know exactly what to do, you spend less time answering “Where do I click?” and more time actually improving your app. 🚀
FAQs
1.How many testers do I need for Google Play Closed Testing?
For eligible personal developer accounts created after November 13, 2023, Google requires at least 12 testers continuously opted in for at least 14 days before you can apply for Production Access.
2.Can I use Google Groups to manage testers?
Yes. Google Play allows closed-test testers to be managed through email lists or Google Groups. If you use a Google Group, users must join the group before opting into the test.
3.What should I tell testers before they install the app?
At minimum, explain how to opt in, which Google Account to use, where to install the app, what features to test, what feedback you want, and where they should report issues.
4.Does Google require testers to open the app every day?
Google's published requirement focuses on continuous opt-in for at least 14 days. Google also evaluates tester engagement and feature usage when reviewing Production Access, but its documentation does not state that every tester must open the app every single day as a universal hard requirement.
5.Should I recruit more than 12 testers?
Recruiting more than the minimum can provide a practical buffer if someone becomes unavailable or stops participating. However, a larger number is a planning strategy, not an additional Google requirement.
6.What happens after the closed test?
Once the required testing criteria are met, you can apply for Production Access in Play Console and answer questions about your testing, app, and production readiness. Google reviews the application and may require additional testing if it determines that the testing was insufficient, including situations involving too few opted-in testers or insufficient engagement.
About the Author

Saksham Goyal
Expert software tester and contributor to the community. Passionate about AI, automation, and user experience.